Verify mTLS Encryption and Use Wireshark in the Kubernetes Cluster
Sniff traffic in the Kubernetes Cluster with ksniff and Wireshark
Introduction
A lot of service mesh implementations promise low-touch TLS implementation, allowing operators to enable this with a single config option or a few lines in a YAML file. However, it is important that you know that the traffic is actually being encrypted successfully. We’re going to demonstrate that this is the case.
With the Istio Service Mesh, Tcpdump doesn’t work in the sidecar pod - the container doesn’t run as root. However, any other container in the same pod will see all the packets, since the network namespace is shared. Iptables will also see the pod-wide configuration.
Communication between the Envoy Proxy (sidecar) and its application happens on 127.0.0.1 (local loopback), and is not encrypted.
Although Wireshark seems to be a daunting tool to use, we will demonstrate how to use it to validate that your service mesh is protecting the data.
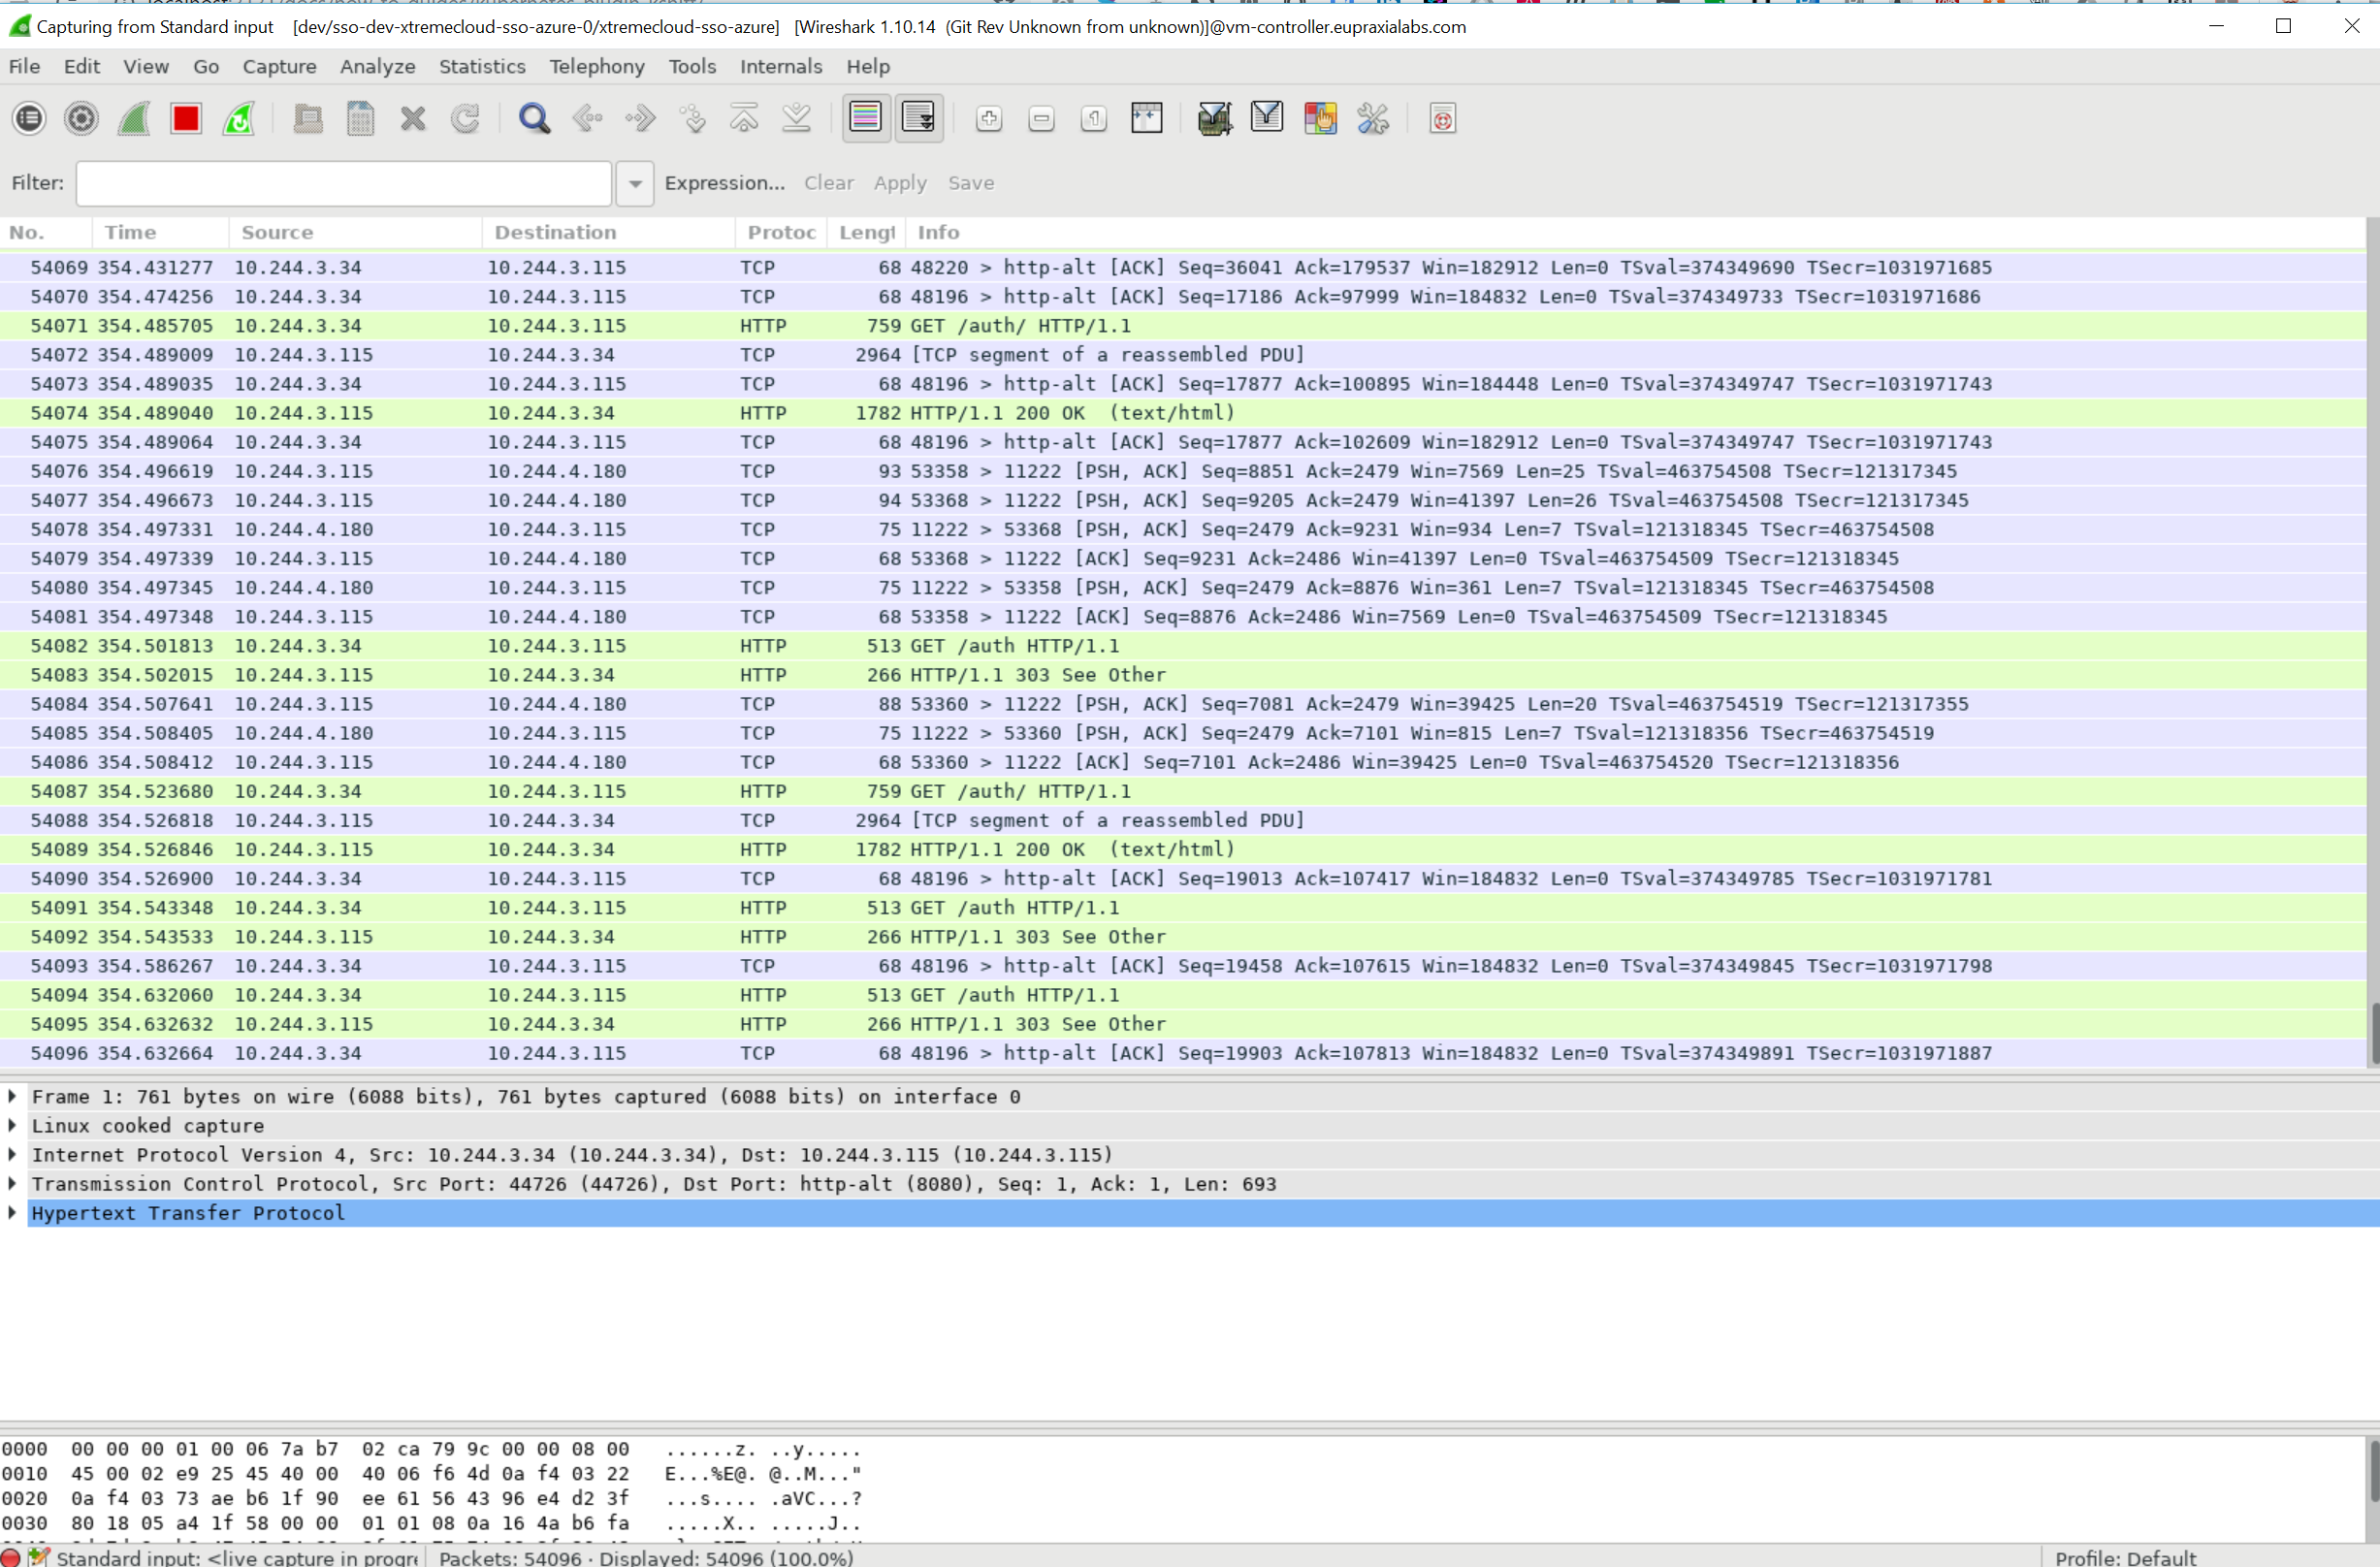
We will be using ksniff and Wireshark in a Kubernetes Cluster to verify that the Aspen Mesh (Istio) is encrypting the traffic all the way to the XtremeCloud SSO container. Additionally, we will show that the clustered containers (SSO and XtremeCloud DataGrid) are updating cache via Mutual TLS (mTLS).
What is krew?
krew is the package manager for kubectl plugins. krew is a tool that makes it easy to use kubectl plugins. krew helps you discover plugins, install and manage them on your machine. It is similar to tools like apt, dnf or brew.
- For kubectl users: krew helps you find, install and manage kubectl plugins in a consistent way.
- For plugin developers: krew helps you package and distribute your plugins on multiple platforms and makes them discoverable.
krew is easy to use:
kubectl krew search                 # show all plugins
kubectl krew install view-secret    # install a plugin named "view-secret"
kubectl view-secret                 # use the plugin
kubectl krew upgrade                # upgrade installed plugins
kubectl krew uninstall view-secret  # uninstall a plugin
Check out the list of [kubectl plugins available on krew][list] or just run
kubectl krew search to discover plugins available on your OS.
Installation
Warning: krew is only compatible with kubectl v1.12 or higher.
macOS and Linux:
Bash and ZSH
- Make sure that
gitis installed. -
Run this command in your terminal to download and install
krew:( set -x; cd "$(mktemp -d)" && curl -fsSLO "https://storage.googleapis.com/krew/v0.2.1/krew.{tar.gz,yaml}" && tar zxvf krew.tar.gz && ./krew-"$(uname | tr '[:upper:]' '[:lower:]')_amd64" install \ --manifest=krew.yaml --archive=krew.tar.gz ) -
Add
$HOME/.krew/bindirectory to your PATH environment variable. To do this, update your.bashrcor.zshrcfile and append the following line:export PATH="${KREW_ROOT:-$HOME/.krew}/bin:$PATH"and restart your shell.
Fish
- Make sure that
gitis installed. -
Run this command in your terminal to download and install
krew:begin set -x; set temp_dir (mktemp -d); cd "$temp_dir" && curl -fsSLO "https://storage.googleapis.com/krew/v0.2.1/krew.{tar.gz,yaml}" && tar zxvf krew.tar.gz && set KREWNAME krew-(uname | tr '[:upper:]' '[:lower:]')_amd64 && ./$KREWNAME install \ --manifest=krew.yaml --archive=krew.tar.gz && set -e KREWNAME; set -e temp_dir end -
Add
$HOME/.krew/bindirectory to your PATH environment variable. To do this, update yourconfig.fishfile and append the following line:set -gx PATH $PATH $HOME/.krew/binand restart your shell.
Windows:
- Make sure
gitis installed on your system. - Download
krew.zipandkrew.yamlfrom the Releases page. - Extract the
krew.ziparchive to a directory, navigate to the directory. - Launch a command-line window (
cmd.exe) in that directory. -
Run the following command to install krew (pass the correct paths to
krew.yamlandkrew.zipbelow):.\krew-windows_amd64.exe install --manifest=krew.yaml --archive=krew.zip - Add
%USERPROFILE%\.krew\binto yourPATHenvironment variable (how?)
Verifying installation
Run kubectl plugin list command to see installed plugins. This command should
show kubectl-krew in the results. You can now use kubectl krew command.
[centos@vm-controller ~]$ kubectl plugin list
The following kubectl-compatible plugins are available:

/home/centos/.krew/bin/kubectl-ca_cert
/home/centos/.krew/bin/kubectl-krew
/home/centos/.krew/bin/kubectl-sniff
/home/centos/.krew/bin/kubectl-view_secret
To view the structure of krew on CentOS 7, for example:
[centos@vm-controller ~]$ tree ~/.krew/
/home/centos/.krew/
├── bin
│   ├── kubectl-ca_cert -> /home/centos/.krew/store/ca-cert/8be8ed348d02285abc46bbf7a4cc83da0ee9d54dc2c5bf86a7b64947811b843c/ca-cert.bash
│   ├── kubectl-krew -> /home/centos/.krew/store/krew/dc2f2e1ec8a0acb6f3e23580d4a8b38c44823e948c40342e13ff6e8e12edb15a/krew
│   ├── kubectl-sniff -> /home/centos/.krew/store/sniff/71102253eded8900c8f7b0d0624c65b3c77ecd6bcd28fabc9a200daac502282a/kubectl-sniff
│   └── kubectl-view_secret -> /home/centos/.krew/store/view-secret/208fde0b9f42ef71f79864b1ce594a70832c47dc5426e10ca73bf02e54d499d0/view-secret.sh
├── index
│   ├── code-of-conduct.md
│   ├── CONTRIBUTING.md
│   ├── LICENSE
│   ├── OWNERS
│   ├── OWNERS_ALIASES
│   ├── plugins
│   │   ├── access-matrix.yaml
│   │   ├── auth-proxy.yaml
│   │   ├── bulk-action.yaml
│   │   ├── ca-cert.yaml
│   │   ├── change-ns.yaml
│   │   ├── config-cleanup.yaml
│   │   ├── cssh.yaml
│   │   ├── custom-cols.yaml
│   │   ├── debug-shell.yaml
│   │   ├── doctor.yaml
│   │   ├── eksporter.yaml
│   │   ├── exec-as.yaml
│   │   ├── exec-cronjob.yaml
│   │   ├── get-all.yaml
│   │   ├── gke-credentials.yaml
│   │   ├── gopass.yaml
│   │   ├── grep.yaml
│   │   ├── iexec.yaml
│   │   ├── ingress-nginx.yaml
│   │   ├── konfig.yaml
│   │   ├── krew.yaml
│   │   ├── kubesec-scan.yaml
│   │   ├── kudo.yaml
│   │   ├── match-name.yaml
│   │   ├── mtail.yaml
│   │   ├── neat.yaml
│   │   ├── node-admin.yaml
│   │   ├── oidc-login.yaml
│   │   ├── open-svc.yaml
│   │   ├── outdated.yaml
│   │   ├── pod-logs.yaml
│   │   ├── pod-shell.yaml
│   │   ├── preflight.yaml
│   │   ├── prompt.yaml
│   │   ├── prune-unused.yaml
│   │   ├── rbac-lookup.yaml
│   │   ├── rbac-view.yaml
│   │   ├── resource-capacity.yaml
│   │   ├── restart.yaml
│   │   ├── rm-standalone-pods.yaml
│   │   ├── sniff.yaml
│   │   ├── sort-manifests.yaml
│   │   ├── ssh-jump.yaml
│   │   ├── sudo.yaml
│   │   ├── support-bundle.yaml
│   │   ├── tail.yaml
│   │   ├── view-secret.yaml
│   │   ├── view-serviceaccount-kubeconfig.yaml
│   │   ├── view-utilization.yaml
│   │   ├── virt.yaml
│   │   ├── warp.yaml
│   │   └── who-can.yaml
│   ├── plugins.md
│   ├── README.md
│   └── SECURITY_CONTACTS
└── store
    ├── ca-cert
    │   └── 8be8ed348d02285abc46bbf7a4cc83da0ee9d54dc2c5bf86a7b64947811b843c
    │       ├── ca-cert.bash
    │       └── plugin.yaml
    ├── krew
    │   └── dc2f2e1ec8a0acb6f3e23580d4a8b38c44823e948c40342e13ff6e8e12edb15a
    │       └── krew
    ├── sniff
    │   └── 71102253eded8900c8f7b0d0624c65b3c77ecd6bcd28fabc9a200daac502282a
    │       ├── kubectl-sniff
    │       └── static-tcpdump
    └── view-secret
        └── 208fde0b9f42ef71f79864b1ce594a70832c47dc5426e10ca73bf02e54d499d0
            ├── plugin.yaml
            └── view-secret.sh

12 directories, 71 files
Upgrading krew
Since krew itself is installed as a “kubectl plugin” managed by krew, it can be
upgraded like a plugin by running the kubectl krew upgrade command.
Documentation on krew
- Users:
- Read the User Guide to learn how to use krew.
- Plugin Developers:
- Developer Guide: how to package and publish a plugin for krew.
- Naming Guide: how to choose a good name for your plugin
- Krew Developers:
- Building Krew (not written yet)
- Releasing Krew: how to release new version of krew.
- Plugin Lifecycle: how krew installs/upgrades plugins and itself.
- Krew Architecture: architectural decisions behind designing krew.
This is the sniff plug-in that we will be using:
$ kubectl krew install sniff
Install the Wireshark Application and the Gnome GUI on CentOS 7
$ sudo yum install wireshark wireshark-gnome
Let’s verify the installation:
[centos@vm-controller ~]$ rpm -qi wireshark-gnome
Name        : wireshark-gnome
Version     : 1.10.14
Release     : 16.el7
Architecture: x86_64
Install Date: Sun 08 Sep 2019 01:43:18 PM CDT
Group       : Applications/Internet
Size        : 2516653
License     : GPL+
Signature   : RSA/SHA256, Mon 12 Nov 2018 08:49:11 AM CST, Key ID 24c6a8a7f4a80eb5
Source RPM  : wireshark-1.10.14-16.el7.src.rpm
Build Date  : Tue 30 Oct 2018 02:44:55 PM CDT
Build Host  : x86-01.bsys.centos.org
Relocations : (not relocatable)
Packager    : CentOS BuildSystem <http://bugs.centos.org>
Vendor      : CentOS
URL         : http://www.wireshark.org/
Summary     : Gnome desktop integration for wireshark
Description :
Contains wireshark for Gnome 3 and desktop integration file
Since the sniff plug-in will run Wireshark as a non-root user, at this stage you will encounter an error message which says. “No interface can be used for capturing in this system with the current configuration”. The following steps will correct this issue.
1. Create the Wireshark group.
     $ sudo groupadd wireshark
2. Add your username to the Wireshark group –
     $ sudo usermod -a -G wireshark USERNAME
3. Change the group  ownership of file dumpcap to wireshark –
     $ sudo chgrp wireshark /usr/bin/dumpcap
4. Change the mode of the file dumpcap to allow execution by the group wireshark –
     $ sudo chmod 750 /usr/bin/dumpcap
5. Grant capabilities with setcap –
     $ sudo setcap cap_net_raw,cap_net_admin=eip /usr/bin/dumpcap
6. Verify the change –
     $ sudo getcap /usr/bin/dumpcap
Run in Privileged Mode
Non-Privileged and Scratch Pods
To reduce attack surface and have small and lean containers, many production-ready containers runs as non-privileged user or even as a scratch container.
To support those containers as well, ksniff now ships with the “-p” (privileged) mode. When executed with the -p flag, ksniff will create a new pod on the remote kubernetes cluster that will have access to the node docker daemon.
ksniff will than use that pod to execute a container attached to the target container network namespace and perform the actual network capture. Use the -p flag when you run the ‘sniff’ plug-in:
$ kubectl sniff -p datagrid-dev-xtremecloud-datagrid-azure-0 -n dev
[centos@vm-controller ~]$ kubectl sniff -p sso-dev-xtremecloud-sso-azure-0 -n dev
INFO[0000] sniffing method: privileged pod
INFO[0000] using tcpdump path at: '/home/centos/.krew/store/sniff/71102253eded8900c8f7b0d0624c65b3c77ecd6bcd28fabc9a200daac502282a/static-tcpdump'
INFO[0000] no container specified, taking first container we found in pod.
INFO[0000] selected container: 'xtremecloud-sso-azure'
INFO[0000] sniffing on pod: 'sso-dev-xtremecloud-sso-azure-0' [namespace: 'dev', container: 'xtremecloud-sso-azure', filter: '', interface: 'any']
INFO[0000] creating privileged pod on node: 'aks-agentpool-15714137-3'
INFO[0000] pod created: &Pod{ObjectMeta:k8s_io_apimachinery_pkg_apis_meta_v1.ObjectMeta{Name:ksniff-gdz8c,GenerateName:ksniff-,Namespace:dev,SelfLink:/api/v1/namespaces/dev/pods/ksniff-gdz8c,UID:5974e584-d26d-11e9-8a3f-06ba29230bee,ResourceVersion:34128236,Generation:0,CreationTimestamp:2019-09-08 14:17:50 -0500 CDT,DeletionTimestamp:<nil>,DeletionGracePeriodSeconds:nil,Labels:map[string]string{},Annotations:map[string]string{},OwnerReferences:[],Finalizers:[],ClusterName:,Initializers:nil,},Spec:PodSpec{Volumes:[{docker-sock {HostPathVolumeSource{Path:/var/run/docker.sock,Type:*File,} nil nil nil nil nil nil nil nil nil nil nil nil nil nil nil nil nil nil nil nil nil nil nil nil nil nil}} {default-token-vk6m7 {nil nil nil nil nil &SecretVolumeSource{SecretName:default-token-vk6m7,Items:[],DefaultMode:*420,Optional:nil,} nil nil nil nil nil nil nil nil nil nil nil nil nil nil nil nil nil nil nil nil nil}}],Containers:[{ksniff-privileged docker [sh -c sleep 10000000] []  [] [] [{KUBERNETES_PORT_443_TCP_ADDR xtremecloud-e9f4d723.hcp.eastus.azmk8s.io nil} {KUBERNETES_PORT tcp://xtremecloud-e9f4d723.hcp.eastus.azmk8s.io:443 nil} {KUBERNETES_PORT_443_TCP tcp://xtremecloud-e9f4d723.hcp.eastus.azmk8s.io:443 nil} {KUBERNETES_SERVICE_HOST xtremecloud-e9f4d723.hcp.eastus.azmk8s.io nil}] {map[] map[]} [{docker-sock true /var/run/docker.sock  <nil>} {default-token-vk6m7 true /var/run/secrets/kubernetes.io/serviceaccount  <nil>}] [] nil nil nil /dev/termination-log File Always SecurityContext{Capabilities:nil,Privileged:*true,SELinuxOptions:nil,RunAsUser:nil,RunAsNonRoot:nil,ReadOnlyRootFilesystem:nil,AllowPrivilegeEscalation:nil,RunAsGroup:nil,ProcMount:nil,} false false false}],RestartPolicy:Never,TerminationGracePeriodSeconds:*30,ActiveDeadlineSeconds:nil,DNSPolicy:ClusterFirst,NodeSelector:map[string]string{},ServiceAccountName:default,DeprecatedServiceAccount:default,NodeName:aks-agentpool-15714137-3,HostNetwork:false,HostPID:false,HostIPC:false,SecurityContext:&PodSecurityContext{SELinuxOptions:nil,RunAsUser:nil,RunAsNonRoot:nil,SupplementalGroups:[],FSGroup:nil,RunAsGroup:nil,Sysctls:[],},ImagePullSecrets:[],Hostname:,Subdomain:,Affinity:nil,SchedulerName:default-scheduler,InitContainers:[],AutomountServiceAccountToken:nil,Tolerations:[{node.kubernetes.io/not-ready Exists  NoExecute 0xc0002ed3d0} {node.kubernetes.io/unreachable Exists  NoExecute 0xc0002ed3f0}],HostAliases:[],PriorityClassName:,Priority:*0,DNSConfig:nil,ShareProcessNamespace:nil,ReadinessGates:[],RuntimeClassName:nil,EnableServiceLinks:nil,},Status:PodStatus{Phase:Pending,Conditions:[],Message:,Reason:,HostIP:,PodIP:,StartTime:<nil>,ContainerStatuses:[],QOSClass:BestEffort,InitContainerStatuses:[],NominatedNodeName:,},}
INFO[0000] waiting for pod successful startup
INFO[0008] pod: 'ksniff-gdz8c' created successfully on node: 'aks-agentpool-15714137-3'
INFO[0008] spawning wireshark!
INFO[0008] starting remote sniffing using privileged pod
INFO[0008] executing command: '[docker run --rm --name=ksniff-container-YfGEOpXT --net=container:82eb3367672cb5b2f4eac0332d949e22574f4616e51d1308e846ba19cba6ecbf corfr/tcpdump -i any -U -w - ]' on container: 'ksniff-privileged', pod: 'ksniff-gdz8c', namespace: 'dev'
Note: The actual encyption vertification documentation for this section is pending the installation of Aspen Mesh on AWS/EKS.