FAS Setup
How to setup FAS for your Frontier Management Cluster (FMC)
Deploy FAS Into Your FMC
To begin this guide, you must first complete the Stackgres guide from Storage Setup tutorial and the Keycloak Setup guide. Although FAS comes packaged with the FKP FMC installation, it pod will not run until all configurations have been satisfied.
FAS Diagram Flowchart
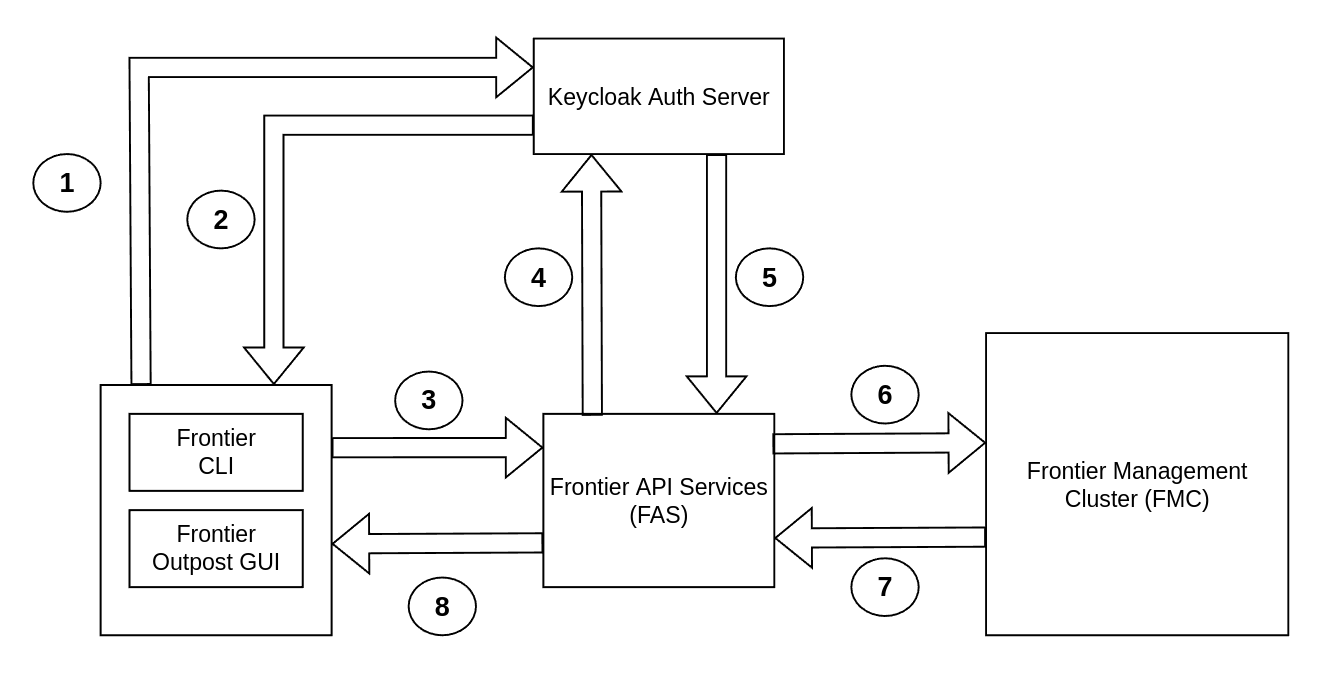
The diagram above shows the flowchart of all used FMC components with FAS when an authorized FKP user makes a request from their Frontier front-end application. The steps of these FAS requests using the diagram flowchart are:
- Step 1: The front-end client user attempts to authenticate to the Frontier Keycloak server to retrieve an access token for the Frontier CLI and/or Outpost application
- Step 2: The Frontier Keycloak server will successfully allow the user to login to the Frontier application to make requests to FAS
- Step 3: Successfully authenticated Frontier application users can make requests to FAS in the FMC cluster
- Step 4: FAS will validate the token from the Frontier application user and verify the request through the Frontier Keycloak server
- Step 5: The Frontier Keycloak server will allow the Frontier application client user to successfully make requests within FAS, as long as the user has the roles and permissions to perform such actions
- Step 6: FAS will use the request to modify any changes within the FMC cluster
- Step 7: The FMC cluster will send a response to FAS that changes have been made by an authorized FKP user
- Step 8: FAS will send the request back to the Frontier application user about any successful modifications that were made within their FMC cluster
FAS Database Setup
We will need to create and enable all required prequisites before connecting FAS services to our SGCluster PostgreSQL database. Taking a look at all our existing database pods using the command:
sudo k3s kubectl exec -ti "$(kubectl get pod --selector app=StackGresCluster,cluster=true -o name | head -n 1)" -c patroni -- patronictl list
We will take the writable [Leader] database and exec into that specific pod.
kubectl exec -it frontier-db-0 -n frontier -- bash
A base shell will appear. Type in the following command to enter your PostgreSQL database configuration:
psql
We will need to write query statements to prepare for the Kubernetes FAS ConfigMap deployment. We will begin by creating the database:
CREATE DATABASE FRONTIER;
Next we will need to create the Frontier user account for the database. Be sure to take note of your username and password. We recommend setting your username to frontier for simplicity. Input any value in for <password>. These values will be used for your Frontier deployment credentials configuration in the manifest.
CREATE USER frontier WITH PASSWORD '<password>';
Once you’ve created the new user, we will now grant all privileges of the Frontier database to the Frontier database user.
GRANT ALL PRIVILEGES ON DATABASE FRONTIER to frontier;
After completing this step, we can then exit out of the PostgreSQL database and pod to begin the FAS configurations.
Requirements for FAS
All configuration settings will be applied in the Kubernetes Configmap required for FAS. The following are all the values that are necessary to run FAS services:
oidc-provider: Name of OIDC Provideroidc-provider-url: URL of OIDC Provider Realmoidc-client: OIDC Client IDoidc-client-secret: OIDC Client Secretdb-selected: The Database Selecteddb-host: The Database Connection Host URLdb-port: The Database Connection Portdb-username: The Database Account Usernamedb-password: The Database Account Passworddb-name: The name of the Databasemaas-consumer-key: FKP FMC MAAS Consumer Keymaas-consumer-secret: FKP FMC MAAS Consumer Secretmaas-access-token: FKP FMC MAAS Access Tokenmaas-token-secret: FKP FMC MAAS Access Token Secretazure-client-id: FKP FMC Azure Client IDazure-tenant-id: FKP FMC Azure Tenant IDazure-sub-id: FKP FMC Azure Subscription ID
Up to this point of the FKP FMC Administration Guide, you should be able to fill in each of these required values. For all oidc values, you should refer back to the Keycloak Setup. With db values, refer to the Persistent Storage Setup. For each of the required values for the infrastructure providers, refer back to the configurations made for your FMC Setup & Installation Guide.
FAS ConfigMap Manifest
We can create a new file named “frontier-api-config.yaml”. We will place the contents below:
apiVersion: v1
kind: ConfigMap
data:
  frontier-api-config.properties: |
    oidc-provider=<provider-chosen>
    oidc-provider-url=<provider-url>
    oidc-client=<provider-client-name>
    oidc-client-secret=<provider-client-secret>
    db-selected=<database-chosen>
    db-host=<database-host-url>
    db-port=<database-host-port>
    db-username=<database-account-username>
    db-password=<database-account-password>
    db-name=frontier
    maas-consumer-key=<maas-consumer-key>
    maas-consumer-secret=<maas-consumer-key> # <--- This is typically blank
    maas-access-token=<maas-access-token>
    maas-token-secret=<maas-access-token-secret>
    azure-client-id=<azure-client-id>
    azure-tenant-id=<azure-tenant-id>
    azure-sub-id=<azure-subscription-id>
metadata:
  name: fas-config
  namespace: frontier
From all the data you have collected, you will insert those into the values of each key. Do not include any quotes and make sure all values are exactly the same from the sources you retrieved them. Once you are done editing the “frontier-api-config.yaml”, we will create the configmap using the following command:
kubectl create configmap api-config --from-file=fas-config=frontier-api-config.yaml
Complete the FAS Setup
We can run the following command to view the current FAS pod:
kubectl get pods -n frontier
Expected Output:
NAME                                   READY   STATUS             RESTARTS        AGE
frontier-db-1                          6/6     Running            0               1d
frontier-db-0                          6/6     Running            0               1d
frontier-cluster-api-b85f9b69d-5vbxz   1/1     CrashLoopBackOff   25 (21h ago)    1d
Now that we have implemented the new ConfigMap with all of FAS configurations, we can restart the pod by deleting it.
kubectl delete pod <pod-name> -n frontier
With the pod deleted, you should then be able to run get pods command again and view a successful running output:
Expected Output:
NAME                                   READY   STATUS    RESTARTS        AGE
frontier-db-1                          6/6     Running   0               1d
frontier-db-0                          6/6     Running   0               1d
frontier-cluster-api-b85f9b69d-2lbtf   1/1     Running   0               50s
You have completed the FKP FMC Installation Guide. You will now be able to manage users for them to have access of the FMC without the need of sharing the kubeconfig file using the Frontier CLI or Outpost GUI applications.